Most websites have one or more pictures on their pages. Such images usually include their site logo, photos of their products, design elements, and perhaps even a picture of their webmaster. This chapter shows you how you can add such images to your site.
Please note that this is the second chapter of the Microsoft Expression Web Tutorial series. I shall assume that you already have done the things mentioned in chapter 1 and are familiar with the concepts introduced there. If this is the first time you are designing a website, I recommend that you start from the beginning, with my article on the steps to creating a website.
By the end of this chapter, you will have placed an image containing your website logo onto your web page, along with any other pictures that you may want there. You will also have learnt ("learned" in US English) how to centre ("center") a picture horizontally on a page, make text wrap around it, as well as to put space between the image and the surrounding words.
You will need the following pictures for this tutorial.
Your website logo is just a picture of some sort that uniquely brands your website. For example, thesitewizard.com's logo can be found at the top left corner of every page of this site, including this one that you are reading.
If your site is for a business, and you already have a company logo, you should of course use that same image. Get a digital copy of that logo, or if you don't have one, scan it (eg, from your company's letterhead) into your computer.
Otherwise, you will have to create one. Your logo does not have to be a masterpiece of artistic talent, but it should be unique, so you will probably not want to get it from a clip art or royalty-free photo collection. If you are at a complete loss as to what to do, read How to Create a Logo for Your Site the Quick and Easy Way for some tips.
In all cases, whether you design one from scratch or use an existing logo, make sure that your image is in the PNG, JPEG (JPG) or GIF graphic file format. Don't use any other format, or your logo may not be displayed correctly in many web browsers. If you have a picture in a different format (eg, a TIFF file or something), convert it with a picture editor. There are many free image editors around, most (if not all) of which can convert pictures from one format to another. (Usually, all that's needed is to open the picture in that software, and save the same file in a different format.)
Other pictures that you may want to display include your product photos (for those intending to sell stuff), holiday snapshots (eg, if yours is a personal site, and you want to inflict your holiday photos on others) and even decorative pictures.
Like all things you put on the Internet, be circumspect about revealing personal details (eg photos of yourself, friends and family, photos of your place of residence, work or school, photos of places you frequent or the routes you take daily, etc). Make sure you know what you are doing before posting such things; they cannot be undone in any effective way — once something is online, someone will probably have a copy of it even if you delete your entire website.
Even if your pictures are already placed in some directory (or "folder" in layman's language) on your computer, you will need to copy them into the directories monitored and managed by Expression Web.
Open the folder where you currently store your images. For example if they are currently located in your "Pictures" directory, open that folder. That is, by the end of this step, you should have a window open showing you the picture files that you want to use for your website. Leave this window open for now, and go on to the next step.
Start up Expression Web, if you have closed it since the previous chapter.
If Expression Web shows you the home page that you were working on in chapter 1, close it by clicking "File | Close". If you remember, this means to click "File" from the menu bar followed by "Close" in the drop-down menu that appears.
Move your mouse pointer so that it is hovering somewhere in the main section of the Expression Web window (in the Site View tab), where your "index.html" and "styles.css" files should be listed. Don't point it at any of the files, but at a blank spot (say) underneath those files.
Now click your right mouse button. A menu should appear. Click "New | Folder..." on that pop-up menu.
A new folder will appear in the section where "index.html" and "styles.css" are listed. Its default name of "New_Folder" will be selected with an edit box around it indicating that you can change its name. Rename it "images" (without the quotation marks). Notice that I said "images" and not "Images" or "image" or any other combination of letters.
If you had accidentally clicked elsewhere before changing the folder name, resulting in the edit box disappearing, you can get it back again by clicking the filename, then pressing the "F2" key on your keyboard.
Now right click the "images" folder. That is, move your mouse pointer so that it is over the word "images" in the file listing, and click the right mouse button.
In the menu that appears, click "Open Folder in Windows Explorer". A folder window will open.
The window will show a number of files, including "index.html", "styles.css" and "images". Depending on your windows settings, you may not see the file extensions (the ".html" and ".css" parts of the filename) and you may or may not also see "_vti_cnf", "_vti_pvf" and "desktop.ini".
Doubleclick the "images" folder. That is, click the "images" folder twice in quick succession. You should now see the contents of the "images" folder, which is, for now, empty.
Switch back to the window that you opened in step 1 and select (ie, highlight) all the files that you want to use on your site. Right click the selection and click the "Copy" item in the menu that pops up.
Switch to the currently empty "images" folder. Right click the blank space in the middle of the window and click "Paste" from the menu that appears. Windows will then copy the pictures into the images directory.
Close both this "images" folder window and the window you opened in step 1. You won't need them any more.
As mentioned in chapter 1, we will be inserting your site logo into the header section (or masthead) of your home page.
Doubleclick the "index.html" file in the Expression Web's Site View pane to open it.
Click to put your text cursor in the header section, somewhere among the words "Placeholder content for your header section [etc]" and delete those words.
Leave your text cursor in the now empty section.
Click "Insert | Picture | From File..." from the main menu.
A dialog box with the title "Picture" will appear. Doubleclick the "images" folder.
You should see the pictures that you copied here earlier. Click the picture that you want to use as your logo. Its filename should appear in the "File name" field. Click the "Insert" button near the bottom of the dialog box.
A dialog box with the title "Accessibility Properties" will appear.
Type "Example Co's logo" (without the quotes) into the "Alternate text" field. You should of course replace the words "Example Co" with either the name of your website or its domain name. The contents of this field will be displayed in non-graphical web browsers, such as the screen reader software used by the blind. It is also used by search engines to understand what the picture shows, since search engines can't actually "see" your picture and appreciate its art.
Leave the "Long description" box empty, and click the "OK" button.
Your logo will now appear on your web page, flushed to the left. (You may not be able to see that it is aligned with the left edge of the page if your logo is as wide as, or wider than, the Expression Web's main section.)
Be patient. We'll fix that in a bit, within this chapter itself. First, we have to deal with a common problem faced by newcomers at this stage.
Now that your logo is inserted into the page, if you are new to web design, you may find that it doesn't look as good as you thought it would. For example, you may not like its colours, or you may find that it is too wide or too tall, or some other thing. Relax. This is normal. Since you're new to web design, you don't have sufficient prior experience to guide you in the creation of a logo, resulting in such teething problems.
The easiest way to solve this is to delete the picture, go back to your picture editor and fix the problem (whatever it may be), copy the newly revised picture into your "images" folder (yes, don't forget to do this, or you'll still see your old picture), and redo the picture insertion process again.
To delete the logo (and in fact, any image that you have inserted into your page), click it once to select it. Then hit the "Delete" key on your keyboard. The picture will immediately be removed. If you're afraid that you won't be able to locate the header section again later (because now it neither has a picture nor the original placeholder words), just type some words there, eg, "picture comes here". You will of course have to delete those words later before reinserting your revised picture.
Before we go into the technical details of centring ("centering") the logo, we need to talk a bit about how your web page appears in a browser.
When you tested your home page in a browser at the end of chapter 1, you may have noticed that it does not look 100% the same as in Expression Web. In fact, the page looks different depending on how wide or narrow you resize the browser. For example, a sentence on your page may only occupy a single line in a big window, but be folded so that it takes up several lines in a narrower one.
This is, of course, expected, and perfectly logical, given that the text size remains the same no matter how wide or narrow the window is. But this malleable nature of a web page also affects how your logo appears on it.
In a narrow window, your logo may appear perfectly placed, spanning its entire width. Widen that window and what was once properly positioned will now appear to dangle on left side, with the right side an empty expanse.
In view of this, I recommend that you follow the instructions given below, even if your logo seems to be perfectly balanced on your page in Expression Web. The only time you should skip the steps below is if you really want your logo to be flushed to the left of your page.
Click the picture once (to select it).
Look at the bottommost panel on the left side of the Expression Web window. The panel has two tabs at the top, "Tag Properties" and "CSS Properties". Make sure the "Tag Properties" tab is selected (otherwise click it once). The panel should look similar to my picture below, although it won't be exactly the same since my logo has different properties. (For example, your logo will probably not be called "Example Co's logo".)
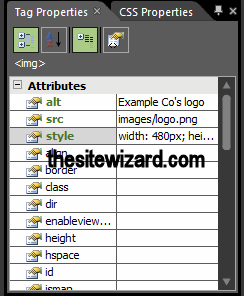
Look at the word "style" in that panel. Notice that the field next to it ends with "...". Click that line (eg click the word "style" if you don't know where to click). This puts the focus on the line and transforms the "..." into a clickable button (although it won't look like one). Click the "...".
This time, a dialog box with the title "Modify Style" will appear. By default, the first line in the left column, "Font", will be selected. Click the "Box" line in that column to select it instead.
Look for "margin" section, and uncheck the box "Same for all" in that section by clicking it. See the picture below to make sure you get the correct field.
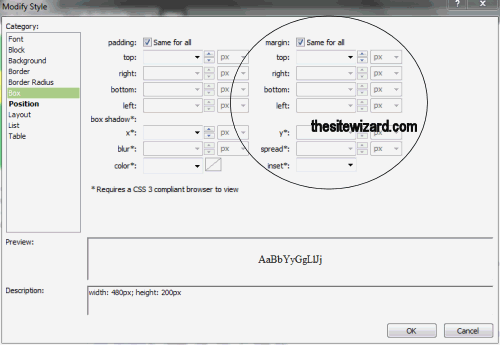
Click the down arrow for the field labelled "right" in the "margin" section and select "auto" in the drop down box that appears.
Do the same for the field labelled "left".
By the end of this step, the dialog box should look like the picture below.
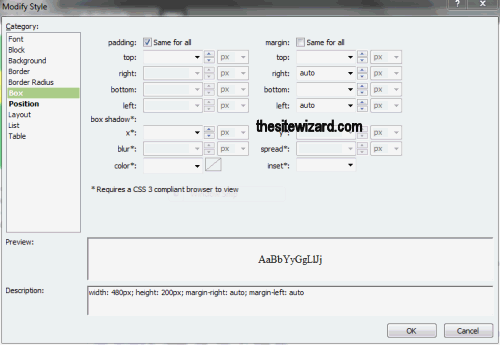
If you find that the "right" and "left" fields are disabled, and cannot be selected, it means that you did not uncheck the "Same for all" box as mentioned earlier.
Now click the "Layout" line in the left column. (It's just underneath "Position" which is under the "Box" line you clicked earlier.)
The contents of the right side of the dialog box will change accordingly. Look for the line that says "display" and click the drop-down arrow for that field. Select "block" from the list that appears.
Click the "OK" button. Your logo should now be centred along the horizontal axis of the page.
Now that you have finished adding your logo, it's time to insert the other pictures. The procedure is the same, except that you have other decisions that you need to make.
There are at least two ways you can put your images onto your page. One is to place them apart from the existing paragraphs. This is the way I have placed the illustrations in this article. (Scroll up to see this.) Each picture stands alone in its own paragraph (loosely speaking). The words in the paragraph above it stop cleanly before the image starts, and the words following form a new paragraph underneath.
Note: I will not go into how you can place a background image (where the picture forms the backdrop behind your foreground content) in this chapter. It will be covered, along with other things, in chapter 4.
To insert a picture this way, do the following:
Position your text cursor after the last letter of the paragraph before the picture and hit the ENTER key to make a new paragraph. This is where the picture will be inserted.
Click "Insert | Picture | From File..." as before, select your picture, and hit the "OK" button.
Enter a brief sentence (or even just a phrase) describing the picture. For example, if your picture shows one of the products you are selling, type its name (eg, "Widget A", without the quotes) into the "Alternate text" field. As mentioned before, the text here is important for accessibility reasons. Then click the "OK" button.
The picture should now appear on the page in its own "paragraph".
On the other hand, if you prefer to have your picture surrounded by text, with the words flowing around either on the left or right of the picture, do the following.
Put your text cursor at start of the paragraph where you want the picture to appear. Do this even if you want it to appear on the right instead of the left.
Insert your picture the usual way at this spot, with "Insert | Picture | From File...". As usual, add the appropriate alternate text when prompted. (If this sounds too vague to you, scroll up this page to see the detailed instructions. It's the same procedure.)
The picture will now appear in an awkward position at the place you inserted it.
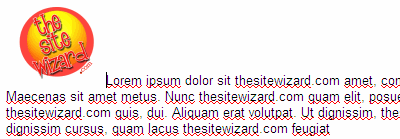
Don't worry. We will fix this in the next step.
Click the picture once to select it.
Look at the "Tag Properties" panel at the bottom left column of Expression Web. Yes, this is the same panel we used earlier for your logo. Again, click the "style" line to put the focus there, and click the "..." on that line.
The familiar "Modify Style" dialog box should appear for your picture. Click "Layout" in the left column.
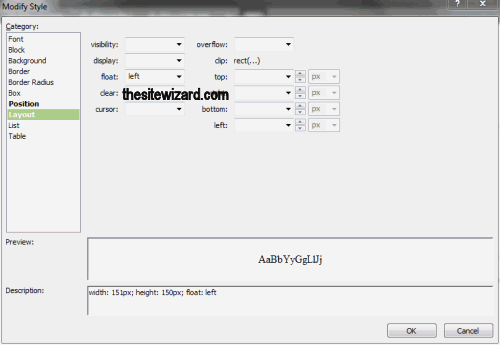
Click the drop down box for "float" in the right column. If you want your picture on the left of the text, click "left". If you want it on the right, click "right". (My illustration below shows the "float" field with "left" selected, but you should choose "right" if that's what you want.)
If you have enough words in the paragraph, they should now flow to the right or left of your picture with any leftover text underneath. However, notice that the words are probably far too close to the picture for it to look good. To fix this, bring up the "Modify Style" dialog box again. (See above if you've forgotten how to do this.)
Click the "Box" line in the left column.
Uncheck the "Same for all" box for the "padding" section. Notice I that said the "padding" section this time, and not the "margin".
What your picture needs is a bit of padding (blank space) between the picture and the words. If the words are on the right of the image, you need a bit of padding on the right (so that it comes between your picture and the words). Otherwise, if the words are on the left, the padding needs to be on the left.
Click to put your text cursor into either the "right" or "left" field accordingly. Then enter "10" (without the quotation marks). The field next to it should now show "px". If it doesn't, click the down arrow and select "px" (which means "pixels"). You are putting 10 pixels worth of space between your picture and the words next to it.
Click the "OK" button to dismiss the dialog box.
The words should now shift slightly away from your picture. To see it properly, you need to click to put the text cursor somewhere on the page (it doesn't matter where) so that the outline around your picture (which is there because you selected it earlier) does not obscure the actual distance.
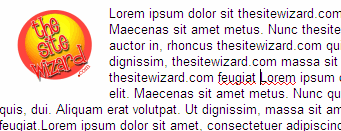
If your words are now too far away (or still too close) to the picture to your liking, go back to the "Modify Style" dialog box and put a different number into the appropriate field. For example, if it is now too far away, change the "10" to (say) "5" and view the result. You can keep repeating these steps with some other number till you get the appearance you want.
Note that if you find the vertical space between the bottom of the picture and the words underneath to be too narrow, you can also adjust the "bottom" field for the "padding" section as well.
Once you have added all the pictures you want, save your changes with "File | Save".
Open your page in a browser as you did in chapter 1, that is, with "File | Preview in Browser".
As in chapter 1, you will probably find that your page looks slightly different here, since the browser window is likely to be far wider than the centre pane of Expression Web. And it also doesn't show all those guiding lines that the editor displays to help you edit your page more intelligently. If you don't like the result you see, go back to Expression Web and make adjustments to the page.
You should probably also resize your browser window to mobile phone sizes the way you did before. Notice that your pictures shrink automatically to fit the window size without the surrounding text also shrinking along with it. This is the result of the responsive web design code produced by the Layout Wizard; it adjusts the elements on the page according to the window size.
In the next chapter, you will find out how to change font sizes, put text in bold and italics, and even switch fonts.
Copyright © 2016-2017 Christopher Heng. All rights reserved.
Get more free tips and articles like this,
on web design, promotion, revenue and scripting, from https://www.thesitewizard.com/.
You are here:
Top » Getting Started with Your Website »
How to Create / Make Your Own Website: The Beginner's A-Z Guide » List of All Expression Web Tutorials »
Do you find this article useful? You can learn of new articles and scripts that are published on thesitewizard.com by subscribing to the RSS feed. Simply point your RSS feed reader or a browser that supports RSS feeds at https://www.thesitewizard.com/thesitewizard.xml. You can read more about how to subscribe to RSS site feeds from my RSS FAQ.
This article is copyrighted. Please do not reproduce or distribute this article in whole or part, in any form.
It will appear on your page as:
How to Add Images and a Site Logo to Your Website with Microsoft Expression Web