Now that you have mastered making links to other pages and sites, it is time to add a navigation menu.
By the end of this chapter, you will not only have added a navigation menu to your website, but also have completed the design of your home page.
As usual, I will assume that you already know the things covered previously. If this is not true, you may want to begin with chapter 1 of the tutorial series. Alternatively, if you have never made a website before, you should start at the very top, with How to Create a Website.
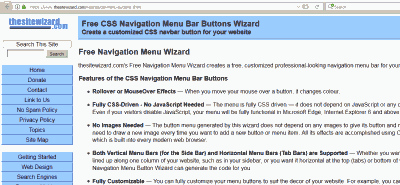
Most websites have some sort of navigation menu. This "menu" is actually just a list of links that point to important pages on the site. You can see an example of this in the left column of every page on thesitewizard.com, including this one (unless you're reading this on a modern smartphone, in which case, you will probably need to scroll to the bottom for the menu). At present, it is dressed up to look like a series of buttons pointing to the home page, the feedback form, the site map, and so on. Other sites may put the menu in the right column, or astride both columns at the top of the page. There are also some that place it at the bottom.
While its placement is not terribly important (as long as you put it in the standard places mentioned above), its existence is. For the most part, your visitors will probably not even notice its presence. Our minds automatically filter out extraneous details so that we can concentrate on our main task of reading the content. However, on those occasions when your visitors need to go to the other parts of your site, the menu becomes extremely useful.
This does not mean that you have to list every single page in the menu. For sites bigger than a few pages, that will probably be impractical. Not only will your menu be excessively long (and therefore too cluttered to be useful), but it will also bloat the size of your page, increasing the time it takes to load. As such, most webmasters only mention certain key pages in the menu. For example, at the time I write this, thesitewizard.com has about 400 pages, but I only list a few.
What constitutes a "key page"? Well, that depends on the purpose of your website. For example, if your site sells products and services, then the pages listing your products, the price list, and the order form are vital. You will want to make sure that no matter which page your visitor is looking at, they will always be able to find their way there. (Otherwise what's the point of your site?) And there are also certain standard links that most visitors expect to see in the navigation menu, like your home page, the site map and the feedback form (also known as the contact form).
Your menu in this chapter will contain at least 3 items: the home page, the site map and the contact (or feedback) form. The home page is mandatory. Although you may think that you already have a link to that through your logo, users old and new expect to see a link to the home page in the menu, so they will often look for it there. The site map is a comprehensive list of all the pages available. You will create that in the next chapter. The contact form allows your visitors to reach you by filling in a form on your website. You will add that in the last chapter.
In addition to those, if your site is a business site, it is customary to have an "About Us" page to tell your visitors about your company. In such a case, you will want to add an "About" (or "About Us") link to the menu as well.
Feel free to add more as you see fit. For example, as I mentioned earlier, if you are selling things, you should add links to your product list, price list and order form. (If your products page already contain the prices, as it probably should, then you can, if you like, omit the price list page.)
Since the navigation menu is essentially just a list of links, it's possible to just to type your own text links and put them into the left column. But what if you want the menu to appear as a series of buttons, like what you see in the left or right column of many sites, including thesitewizard.com? This chapter shows you how to do that. (However, don't let that limit you; if you prefer to have a simple text-based menu, go ahead and create that instead. You have already learnt how to do that in chapter 5.)
Go to the Navigation Menu Wizard.

Like all the wizards you will use in this tutorial series, it's free.
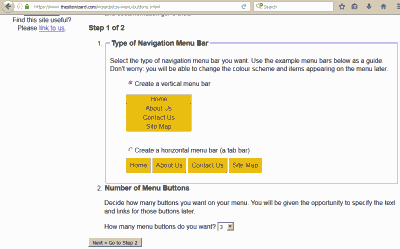
Scroll down the page till you get to the "Step 1 of 2" section.

Make sure that the radio button for "Create a vertical menu bar" is selected, as it should be by default. Then click the down arrow for the "How many menu buttons do you want?" field and select the number of buttons you need. If you can't decide, pick 3 (for your Home, Site Map and Contact pages). If you need more than 20, just select 20. You can easily add or delete buttons in Expression Web, so don't get stuck here mulling over the number of buttons.
Click the "Next» Go to Step 2" button.
The Wizard now allows you to choose the colours ("colors" in US English) for your menu. There are only a few preset choices, but the "Your Own Colour Scheme (for Advanced Webmasters Only)" section allows you to set any colour you like. (For the preset choices, you can move your mouse pointer over each button to see its colour when a mouse is hovering over it.)
If you can't find a colour scheme that you fancy (or that matches your design), just randomly choose one of the preset choices for the time being, instead of using the "Your Own Colour Scheme" section. I will show you how to use Expression Web's internal colour picker (which you will remember from chapter 4) later to modify the colours.
To choose a colour scheme, click one of the preset buttons. For example, clicking "Blue 1" will give your menu the same colours as thesitewizard.com's, while "Orange" will result in a menu with thefreecountry.com's colours.
When you click one of the buttons, the fields in the "Your Own Colour Scheme" section will automatically be filled with the colours that you selected.
Scroll down the page and enter "90%" (without the quotation marks) into the "Width of the button" field, replacing the default of "180px". Do not insert any space between "90" and the "%" sign.
In the "Button Text and URLs" section, enter the label for each of the buttons, along with the URL the button should link to.
For example, the following can be entered for the Home, Site Map and Contact buttons. (Remember to substitute your own domain name in place of "www.example.com" below.)
Text on Button 1: "Home" (without the quotes); URL: "http://www.example.com/" (without the quotes).
Text on Button 2: "Contact" (without the quotes); URL: "http://www.example.com/feedback.html" (without the quotes).
Text on Button 3: "Site Map" (without the quotes); URL: "http://www.example.com/sitemap.html" (without the quotes).
Important: I suggest that you use the filename of "feedback.html" for
your Contact Form as mentioned above. This will make things easier for you when you
create it
in the final chapter, since that is the name that I will assume you used. Type whatever you want
for the "Text on Button 2" field (eg, "Support" or "Feedback" or "Comments" if you don't like "Contact"),
but make sure that the URL field uses a filename of "feedback.html". For example, if your domain
is "www.example.com", the URL field can either say "http://www.example.com/feedback.html" (if you
want an absolute URL) or "feedback.html" (if you prefer relative URLs).
Ignore the "Target frame" field.
Read the terms of use in the "Conditions for Use (Required)" section, and if you agree to them, click the associated checkbox.
Click "Generate buttons". The Wizard will create the code according to your specifications and present you with the Results page.
Start up Expression Web, or switch to it if it is already running. Do not close your web browser. You're not done with it yet.
Click "File | New | CSS" from the menu. If you experience a sense of déjà vu here, it's because you have done such a procedure before (in chapter 1). You will be greeted with an empty page.
Switch back to your web browser and click somewhere in the box in the "Cascading Style Sheet (CSS) Code" section. The text in the box will automatically be selected (ie, highlighted). Click your right mouse button while its pointer is hovering somewhere in the box to bring up the context menu. Click the "Copy" line in that menu.
Immediately switch back to Expression Web and click "Edit | Paste" from the menu. The CSS code will appear on the page.
Click "File | Save As" from the menu.
Type "tswnavbar.css" (without the quotation marks) into the "File name" field of the "Save As" dialog
box.
Click the "Save" button.
Click "File | Close" to close the CSS file, so that you don't accidentally modify it later.
Open your home page in Expression Web, if it's not already open.
Click "Format | CSS Styles | Attach Style Sheet...". A small dialog box with the title "Attach Style Sheet" will appear.
Click the "Browse" button to bring up the "Select Style Sheet" dialog box.
Click "tswnavbar.css" from the list of files shown, followed by the "Open" button.
You will be returned to the "Attach Style Sheet" dialog box. Click "OK".
Switch to your browser and scroll down to the "HTML Menu Button Code" section. (Yes, skip the "HTML Code for the <HEAD> Section" since you have already done that using the "Attach Style Sheet" dialog box in the preceding steps.)
Click the box in that section. This should, as before, automatically cause all the text there to be selected. Right click the highlighted text followed by "Copy" in the menu that appears.
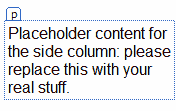
Return to Expression Web. Look at the side column. At present, you should see the words "Placeholder content for the side column [etc]" inside a rectangular box labelled "p" (see picture below).

If you don't see the "p", click to put your text cursor anywhere among the words in the side column, and it will appear.
The "p" merely indicates that the words are placed inside a "paragraph" tag.
Click the "p" label. This will select the entire paragraph, including its tag. (Your mouse pointer will change into one that looks like arrows pointing in four directions when it hovers over "p", but you can still use it to click the "p".)
Hit the Delete key on your keyboard. Both the words and the paragraph will disappear.
Your text cursor will now appear be framed by a rectangular outline with the label "div#tswsideproper".
Immediately click the "Code" tab at the bottom of the Expression Web window to go to the Code view. Recall that you did this before, in chapter 1. (For those who can't locate it, the "Code" tab is next to the "Design" and "Split" tabs.)
Expression Web will now show the underlying HTML code of your web page. At present, your text cursor should be somewhere in the following lines:
Click to put your text cursor in the blank line between the comment saying "start of side column" and the one saying "end of side column" (see picture below).

Click "Edit | Paste" from the menu. The code you copied earlier should appear.
Click the "Design" tab at the bottom of the window to return to the visual design mode.
Unfortunately, due to bugs in Expression Web, the menu will not be displayed correctly. (That is, the background colour of the buttons do not extend beyond the words on them, and they do not even remotely resemble buttons.) Don't worry, we will fix that in the next step.
Note: if you don't see any menu at all, it means that you copied the code from the wrong part of the Results page. As mentioned earlier, you were supposed to copy from the "HTML Menu Button Code" section, not the "HTML Code for the <HEAD> Section".
Click "File | Save All" from the menu to save everything. Then close the file with "File | Close" and reopen it again by doubleclicking "index.html" from the main Site View panel. The menu should now be displayed correctly. If it isn't, close the entire Expression Web program, then restart it again. When you reopen the file, the buttons will be rendered properly.
Note that this is merely due to bugs in Expression Web's handling of CSS. It doesn't actually affect how a real web browser displays the page. You can always verify this by clicking "File | Preview in Browser" to see the menu in a browser.

Incidentally, the colour of the menu buttons will not change when your mouse is hovering over it in the editor. This is not a bug. Expression Web's primary purpose is for you to design your web page, not to show you all its interactive features. You will have to test that aspect in a real browser.
I mentioned earlier that you can change the colours of the menu from within Expression Web. If you are satisfied with the existing colour scheme, feel free to skip this section.
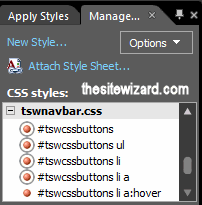
Look at the Manage Styles panel at the bottom right of Expression Web. You should be familiar with this from repeated use in the previous few chapters. Scroll down till you see the bold "tswnavbar.css" subheading in the list. The selectors listed below that were created by the Navigation Menu Wizard and they are responsible for the buttons' appearance.
Right click the "#tswbuttons li a" line (see picture) to bring up the context menu.

Notice that I said the "#tswbuttons li a" line and not the
"#tswbuttons li a:hover" line. If you are not sure which line you are right-clicking,
one way is to click the line with the left mouse button first, to select it, then right-click that same line
to bring up the menu. The left click makes Expression Web highlight the line, so that it is easier
to ensure that your mouse pointer is over the correct spot.
Click the "Modify Style" item in the menu.
The "Modify Style" dialog box will appear. Make sure that the "Selector" field says
"#tswbuttons li a". If it ends with "a:hover, it means that you have right-clicked
the wrong line and will need to click the "Cancel" button and redo the above 2 steps.
Click the "Background" line in the left column. This will put the familiar "background-color" field (which you have already met in chapter 4) into the right side of the dialog box. Change the colour in the usual way to whatever you want. (See chapter 4 if you have forgotten how to do this.)
You will probably also need to change the border colour as well. This is the colour of the button's outline (the thin rim around it). To do this, click the "Border" line in the left column.
Click the coloured rectangle on the rightmost end of the field labelled "top", and choose a new colour.
Now click the "Font" line in the left column. Notice that the "color" field on the right side has a colour set for it too. This is the colour of the words on the menu button. You should set this to something that contrasts sharply with your new background colour, otherwise your menu buttons will be very hard to read. For example, black text on a white background is considered a good contrast, while red text on a blue background (or vice versa) will probably cause your visitors to go blind trying to read it.
To change the colour of the text, click the colour box for that field and pick a new colour.
Click the "OK" button. Your changes should be reflected on the page. If you don't like what you see, just redo the above steps till you get the desired effect.
Note that you are still not done. You have only changed the colour of the button in its normal state.
To change its colour when a mouse pointer is hovering over it, right click the
"#tswcssbuttons li a:hover" line in the "Manage Styles" panel.
Click "Modify Style" in the menu that pops up.
Verify that the "Selector" field says "#tswcssbuttons li a:hover" before continuing.
Click the "Background" line in the left column and change the colour of the "background-color" field to whatever you want.
Click the "Font" line in the left column, and again change the "color" field so that your words can be seen clearly against your new background colour.
Click the "OK" button.
Click "File | Save All" and check your work in a web browser. Remember to move your mouse over the button to test the "hover" colours.
You do not have to go back to the Navigation Menu Wizard every time you want to add or delete a button. This is easily done from within Expression Web.
To add a button, do the following.
Click to put your text cursor on the button before the one you want to insert. For example, if you want a new button between (say) your "Home" and "Contact" buttons, put your text cursor on "Home".
Using your arrow keys, move the text cursor so that it is positioned immediately after the final letter on that button. For example, if the button in question is "Home", position the text cursor so that it is immediately to the right of the "e".
Hit the ENTER key.
Type the words that are supposed to go onto the button. For example, if you are creating a button that says "Order", type "Order" (without the quotes). The word will appear in the wrong colour on a background that is also incorrect. Don't worry. You didn't do anything wrong. This will be fixed in the next step.
Select what you just typed by dragging your mouse over it to highlight it. Then click "Insert | Hyperlink".
You will get the same dialog box you met in chapter 5. Use the same procedure to enter a URL (whether relative or absolute) and click the "OK" button when done. If you are using a relative URL to link to a page you have not created, remember to click the "Edit the new document later" radio button, otherwise Expression Web will create a blank page and open it for you immediately.
Your new button will now look and function exactly like the other buttons.
To delete a button, do the following.
Click to put your text cursor in the button you want to delete.
Erase the text in the usual way, for example, with the Backspace or Delete key. When you delete the last character in the label, the button will change to the same colour as the side column.
In the now blank line, hit the Delete key. Note: you must use the Delete key and not the Backspace key to get rid of the final vestiges of that line. Expression Web has a bug where hitting the Backspace key in this situation creates a new paragraph instead.
The entire menu line should disappear.
When you're done, remember to save your work and test it in a browser.
As of this chapter, your home page is done. If you were deferring any changes to later, because you thought you still had a long way to go, this is the time to do those things. From the next chapter onwards, you will be working on your other pages.
With your home page completed, it's time to turn your attention to the rest of the site. You will do this with the help of Expression Web's template system, which lets you create and maintain multiple pages efficiently.
Copyright © 2016-2017 Christopher Heng. All rights reserved.
Get more free tips and articles like this,
on web design, promotion, revenue and scripting, from https://www.thesitewizard.com/.
You are here:
Top » Getting Started with Your Website »
How to Create / Make Your Own Website: The Beginner's A-Z Guide » List of All Expression Web Tutorials »
Do you find this article useful? You can learn of new articles and scripts that are published on thesitewizard.com by subscribing to the RSS feed. Simply point your RSS feed reader or a browser that supports RSS feeds at https://www.thesitewizard.com/thesitewizard.xml. You can read more about how to subscribe to RSS site feeds from my RSS FAQ.
This article is copyrighted. Please do not reproduce or distribute this article in whole or part, in any form.
It will appear on your page as:
How to Insert a Navigation Menu into Your Website with Expression Web