If you are like most webmasters, you will undoubtedly want to put a few pictures on your website, be they photographs or decorative pictures. At the very least, you should have some sort of logo, a picture that identifies your site and distinguishes it from others. This chapter takes you through the steps of inserting such images using BlueGriffon.
If you have arrived at this page from outside thesitewizard.com, please note that this is the second chapter of the BlueGriffon Tutorial. If you do not have a website yet, I recommend that you begin with the guide on how to set up a website.
By the end of this chapter, you will have inserted your website logo into your home page, and optionally added one or more pictures as well.
You will need the following images for this chapter.
Many websites put a logo on every page of their site to serve as a sort of brand symbol. An example of a logo can be found at the top left hand corner of every page on thesitewizard.com, including this very page you're reading.
If you're creating a business website, and your company already has a logo, just use that same logo for your website. You'll need a digital copy of your picture in either the JPG, PNG or GIF format. If you don't have an electronic copy of that logo, scan it from your letterhead (or whatever) into your computer using a scanner, or at worst, take a picture of it with your camera. Remember that your picture has to be in one of the three formats mentioned above. Do not use any other format or it won't show up correctly on your website on many computers.
Otherwise, you'll just have to create your own logo. If you are not the artistic type, and you don't know how to do this, you may want to read my guide on How to Create a Logo for Your Site the Quick and Easy Way. The guide also gives some hints as to how large (or small) your picture should be in order to fit into your web page.
Incidentally, although you may be tempted to look for some royalty-free images on the Internet to use as your logo, it's generally best to use a completely original picture rather than get some clip art that other websites are also using for their logo.
You may also want to get some photos, drawings or other images to display on your site. For example, those selling physical products may want to snap a few pictures of those items. As before, make sure that your pictures are in one of the three web-friendly formats, namely, PNG, JPG and GIF.
If you want to draw pictures or some sort of decorative art for your site, you will need an image editor of some sort. If you don't already have one, there are numerous free picture editors on thefreecountry.com. Other useful free resources include Free Screen Capture Software, which can take pictures of the things currently displayed on your computer screen, and Free Stock Photos for pictures of scenery that can be used to beautify your page.
The picture editors mentioned earlier can also be used to resize large pictures to a more reasonable size. While BlueGriffon does not prevent you from placing a gigantic picture on your site, a picture that is too wide or tall will cause your website to look somewhat odd, where your picture occupies practically the entire window, pushing your words and other content off the screen.
In chapter 1, you created a folder to place your website files. For the work in this chapter, you will need to create a sub-folder within the folder you created previously. And you will need to copy all the images used on your website to this folder.
Note that this section is required. I know that some of you are thinking that you can just leave your pictures in whatever folder they are currently located in and it'll still work. If you do that, you will later find that your pictures do not appear on your actual website on the Internet even though they look fine on your computer. In other words, do NOT skip this section.
Open the website folder. For example, if it is on your computer desktop, doubleclick it to
open it. You should see the index.html and styles.css files that you created in chapter 1.
You may also see a file called index.html.bak, if you have saved your home page more than once.
If you don't see the extensions of the files, but only see index and styles (and perhaps
index.html if you have an index.html.bak file), it means that Windows has hidden the full
filename from you. If so, you may want to
force Windows
to always show you the file extension, since as a webmaster, you really need such information or you'll end up
making critical mistakes later. Note that I will assume in the rest of this tutorial series that you are able to see
the full filename (extension and all) in Windows.
Mac OS X users should do the functional equivalent for their system. That is, use the Finder to open the folder
that contains your index.html and styles.css files from the previous chapter. Note
that I will not repeat this paragraph for the rest of the steps in this section, but please do the
equivalent operation in Finder for the other steps too. Don't worry. Once we get back to using BlueGriffon,
you'll be guided step-by-step again. It's just that this section involves Windows Explorer and the Mac Finder,
both of which operate differently, and I don't have a Mac, so I can't help you. Linux users should also
do the equivalent for their systems.
Right-click in a blank spot in that folder, for example, below the index.html and styles.css
files. ("Right-click" means to click the right mouse button.) This will cause a pop-up menu to appear.
Click the "New" item on that menu, followed by "Folder" in the submenu that appears.
A folder called "New Folder" will appear. Change the name "New Folder" to "images". Notice carefully
that I said to change it to "images" and NOT "Images" (with a capital "I") or
"IMAGES". That is, use small (lowercase) letters for the entire word. Do not use any other name. Do not add
spaces. If you do, that name
will come back to haunt you in the future.
Hit the ENTER key after typing in the new name, so that Windows does the actual work of renaming.
Doubleclick the folder you just created to open it. You should now see a blank window. Leave this window open.
Open a new Explorer (or Finder) window and navigate to the folder containing the images that you want on your website. For example, you can do this by clicking the Start menu, followed by "Computer", then navigate to whatever location you previously saved your pictures.
At this point, you have 2 windows open on your computer.
Right click the picture that you want for your site. In the menu that appears, click "Copy".
Switch to the blank "images" window. Right click the blank space in the window to produce the pop-up menu again. This time, click "Paste".
If you have more than one picture, you can repeat this procedure of copying and pasting till all your pictures have been copied into the "images" folder.
Note: some of you might be tempted to simply drag all your pictures to the "images" folder. I didn't suggest this because the result may not be what you expect, depending on whether your original folder and your "images" folder are on the same drive, and which version of the operating system you're using. You may end up moving all the files, or copying the files, or even just making shortcuts pointing to those files (instead of actually copying them). Unless you can recognise the difference between a shortcut and a real file, I recommend that you just follow the steps above, to be safe.
Close both folder windows. You don't need them any more.
If you don't already have BlueGriffon up and running, start it up. In certain versions of BlueGriffon (earlier ones, I think),
it will automatically open the web page you were working on previously. If this does not happen, and you're greeted with a
blank screen, click "File | Open File" from the menu. For those who have forgotten my conventions, when I say to click
"File | Open File", it means to click "File" from the menu bar, and when a drop-down menu appears, click the "Open File"
item on that menu. This should cause a dialog box with a title of "Choose a file" to appear. Navigate to your website's folder
if you're not already there. Click the "index.html" file that you designed in chapter 1 once, to select it. Click
the "Open" button.
Click to put your text cursor somewhere in the header section. By default, it should currently have the words "Placeholder content for your header section..." (etc). Use the arrow keys on your keyboard to move the cursor to the end of the paragraph, so that the cursor is just after the full stop (or "period" in US English) following the word "whatever".
Delete all the placeholder words, leaving the cursor in the now empty paragraph.
Click "Insert | Image" from the menu.
A dialog box with the title "Insert an image" will appear. Click the folder icon at the end of the "Image location" field.
The "Select Image" dialog box will appear. Doubleclick the "images" folder. This is the folder you created earlier in this chapter.
Click the picture that you want to use as your logo once, to select it.
Click the "Open" button.
You should now be back at the "Insert an image" dialog box. Click the checkbox for "Make URL relative to page
location", just under the "Image location" field, to put a tick in it. The contents of the field should now
show "images/logo.png", where logo.png is the name of your image, instead of the
long line that originally said something like "file:///C:/Users/ChristopherHeng/Desktop/website/images/logo.png".
Click to put your text cursor in the "Alternate text" field and enter "Example Co's logo", without the quotation marks, of course substituting your site's name or domain in place of "Example Co".
The "Alternate text" field is meant to contain a brief description of what the picture shows. It is meant for blind users and search engines. Since both these groups of visitors are unable to see your picture, the alternate text describes it for them. You do not need to give a detailed description of your picture, just a brief summary of what it shows. For example, for the site logo, saying "Example Co's logo" or the like is sufficient. And if you later insert a picture of one of your products, just give the name your product that you're showing, eg "Widget A", or whatever.
Click the "OK" button.
Your logo should now appear on the page.
If this is your first website, you may be staring at your page in horror, thinking the logo is too big, too small, too gaudy, too ugly or some such thing. Don't worry. This is fairly common for newcomers. It occurs because you have no previous experience to guide you.
The easiest way to fix this is to delete the picture from your page, return to your image editor and touch up the picture, then copy it back into your images folder and redo the steps above.
To delete the picture, click it once to select it and hit the Delete key on the keyboard.
Depending on the size of your picture and the width of your BlueGriffon window, your logo may appear flushed to the left, with a lot of empty space on the right. Even if it appears perfectly positioned here, it may not be when it is displayed in a real browser, since the width of a browser window is different from that of the editor. And that doesn't even take into account people who have bigger monitors with wider screen resolutions than you.
As such, I recommend that you do the following to centre ("center") your logo on your page, even if it currently looks adequately balanced in BlueGriffon. The only time you should skip it is when you actually want it to be flushed to the left.
Click the logo (or whatever picture that you want to centre) once to select it.
Click "Panels | Style Properties" from the menu.
The "Styles Properties" side panel will appear on the right side of the BlueGriffon window.

By default, it probably appears somewhat crammed with its text truncated (see picture above). You can resize the panel by moving your mouse so that it hovers over the border between the panel and your web page, then dragging it (that is, click the left mouse button and hold it down while moving the mouse) to expand it.
Click the line "POSITION AND LAYOUT" to expand the section.
Click the down arrow for the "Display" field and select "Block" from the drop down list.
An orange block will appear at the top of the Style Properties panel. Enter "logo" (without the quotation marks) into the "Please enter an ID" field, and click "ok".
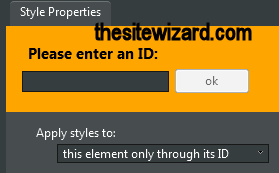
Click the "POSITION AND LAYOUT" line again to collapse the section below.
Click the "GEOMETRY" line to expand it.
You may need to widen the Style Properties panel even further for this section, otherwise you won't be able to see the stuff on its right side.
Scroll down the panel to see the Margins portion of the GEOMETRY section (see picture).
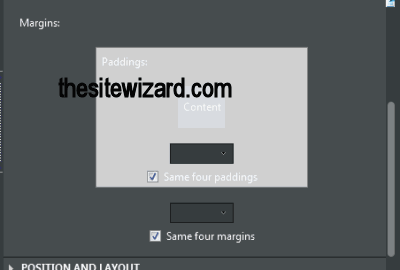
Click to remove the tick in the "Same four margins" checkbox. Four additional fields will appear, one on top of the grey rectangle, one on its left, one on its right and the final one at the bottom.
Click the down arrow in the field on the left and select "Automatic". Do the same for the field on the right. The word "auto" will be displayed in those fields. See the picture below to see what the Margins section should look like at the end of this step.
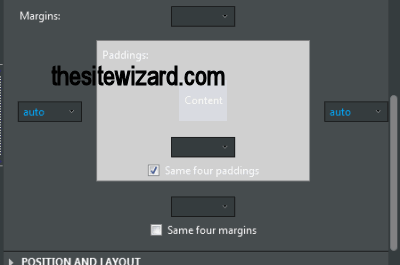
If you were to look at your page now, the logo should be in the centre.
Click "Panels | Style Properties" from the menu again to remove the panel.
You may find that your logo is too far away from the two columns below. That's because there is an empty paragraph between the picture and those two columns. If this is unacceptable to you, do the following.
Click to put your text cursor in the empty paragraph below the logo.
Use the Backspace key to delete it. You may need to use the Backspace twice, once to delete the invisible space character in that paragraph, and once to remove the paragraph itself.
Important: do not delete this empty paragraph until after you have inserted your logo. If you delete it along with the placeholder text before inserting an image, BlueGriffon will delete the entire header section behind the scenes.
Inserting images into the other parts of a web page basically follow the same procedure as inserting the logo. However, you have to decide how you want the picture to appear.
If you want your picture to stand on its own, without words wrapping around it, create a new (empty) paragraph before you insert the picture. You can do this by hitting the ENTER key (or RETURN key on the Mac) to move the existing paragraph down one line. Then use the arrow keys on your keyboard to move your text cursor back up to the empty paragraph you just inserted. You can then put your picture in that spot using the "Insert | Image" menu item. Remember to add a tick to the "Make URL relative to page location" checkbox and give a brief description of the picture in the "Alternate text" field.
If this procedure sounds familiar, it's because this was what you did with your site logo earlier.
You can also have the words of your paragraph flowing around it to the left or right of your picture.
For those who want the picture to stand to the left or right of the words in a particular paragraph, do the following.
Put your text cursor at the beginning of the paragraph in question. (You can do this by clicking somewhere in the paragraph and use the arrow keys on your keyboard to move the cursor to the start of that paragraph.) Do this even if you want the picture to be flushed to the right.
Insert the picture in the usual way (see above) with the "Insert | Image" menu item.
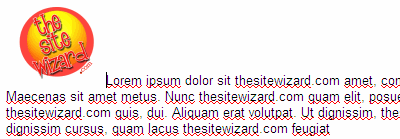
Your image will now be inserted in a somewhat awkward position into your page. (See picture below.)
Click the picture once to select it.
Click "Panels | Style Properties" from the menu.
Click the field for "Apply styles to:" at the top of the Style Properties panel. Click the line "this element, through inline styles" to select it. If you use BlueGriffon 3.0.1, the box will not be updated to show that you selected this particular option, but continue to show up as empty (as though you didn't choose anything). However, in my test, it seems like the program registers internally that you have selected it.
Click "POSITIONING AND LAYOUT" to expand it.
If you want the picture to be on the left of your paragraph, click the leftmost icon for the "Float" line. If you want the picture on the right of your paragraph, click the rightmost icon for the "Float" line. (See the screenshot below if you don't know where the Float line is.)
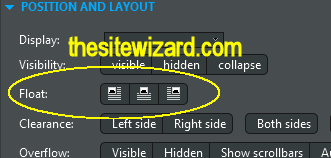
You should see the results on your web page immediately when you do this. Unfortunately, the picture will most likely be too close to the adjacent words.
We will fix this in the next step.
Click to select the picture again, if somehow it became no longer selected after your previous step, which was the case for me when I tried it.
Click the "POSITIONING AND LAYOUT" line of the Style Properties panel to collapse that section.
Click the "GEOMETRY" line to expand the section.
Scroll to the Margins portion and click to remove the tick in the "Same four margins" checkbox.
You can now set the width of the gap between the picture and its surrounding words. If your picture is to the left of your words, you will want to put some space in the right margin. If your picture is to the right of the words, the space has to be put in the left margin.
The field for the right margin is the one on the right of the big grey box, and the one for the left margin is on its left. Click the appropriate field to get a drop down box.
Select "0px" from the list that appears. This will put "0px" (which stands for zero pixels) into the field you selected. Use your arrow keys to move the text cursor to the "0" and change it to 5. The field should now say "5px", which means 5 pixels. That is, you have just set a gap of 5 pixels between the picture and the words.
The effect on your page should be immediate. If the gap is too small, increase the number accordingly. For example, try 6px or 7px or whatever you like. If it is too big, change it from 5px to a smaller number, such as 4px. You can keep adjusting the number till the space between the picture and the words is to your liking.
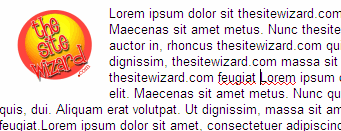
If the gap between the bottom of the picture and the words below is also too narrow, do the same for the field that is underneath the grey box. That is, click to put "0px" into that field, and change the number to one that suits your design.
When you are satisfied with the results, click "Panels | Style Properties" to remove the Style Properties panel.
Save your work with "File | Save". Then open the page in a web browser to check it as you did in chapter 1. Remember to resize your browser window to see the results in mobile phone sizes as well.
In the next chapter, you will learn how to change fonts, use bold and italics and change the colour of the text.
Copyright © 2017-2018 Christopher Heng. All rights reserved.
Get more free tips and articles like this,
on web design, promotion, revenue and scripting, from https://www.thesitewizard.com/.
You are here:
Top » Getting Started with Your Website »
How to Create / Make Your Own Website: The Beginner's A-Z Guide » List of All BlueGriffon Tutorials »
Do you find this article useful? You can learn of new articles and scripts that are published on thesitewizard.com by subscribing to the RSS feed. Simply point your RSS feed reader or a browser that supports RSS feeds at https://www.thesitewizard.com/thesitewizard.xml. You can read more about how to subscribe to RSS site feeds from my RSS FAQ.
This article is copyrighted. Please do not reproduce or distribute this article in whole or part, in any form.
It will appear on your page as:
How to Add Pictures and a Site Logo to Your Website with BlueGriffon 2 and 3